This is a quick and dirty guide to setup the Pi with Raspbian, then install the Wifi-stick and Retropie
1) Get the latest RASPBIAN image <here>
2) Download SD Formatter <here>
3) Download Win32diskimager <here>
4) Format SD Card using SD Card Formatter
5) Copy Image using win32diskimager
Start Win32diskimager as ADMIN. Right-click, start as admin. Do it.
Select the extracted Raspbian image (something .img). As drive, select the drive where your freshly formatted SD Card is located.
Click “write”. Finito. It takes some time…
Start Raspberry Pi 2
1) In Raspi-Config, select “internationalization options”, choose your timezone and keyboard layout. Some layouts might be hidden like the “Switzerland (French) or French (Switzerland)”. Select German (Switzerland), then you can chose the right one.
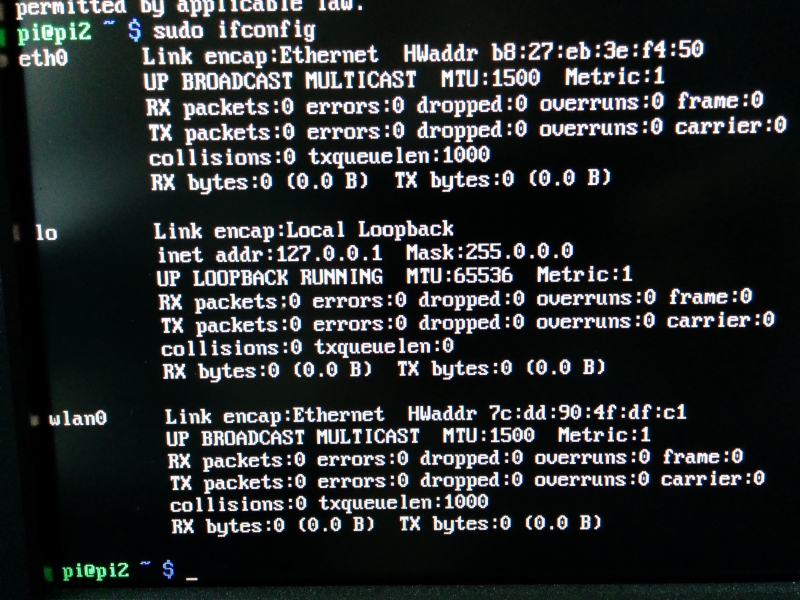
2) Check if the Raspi has identified your USB Wifi dongle:
# sudo lsusb
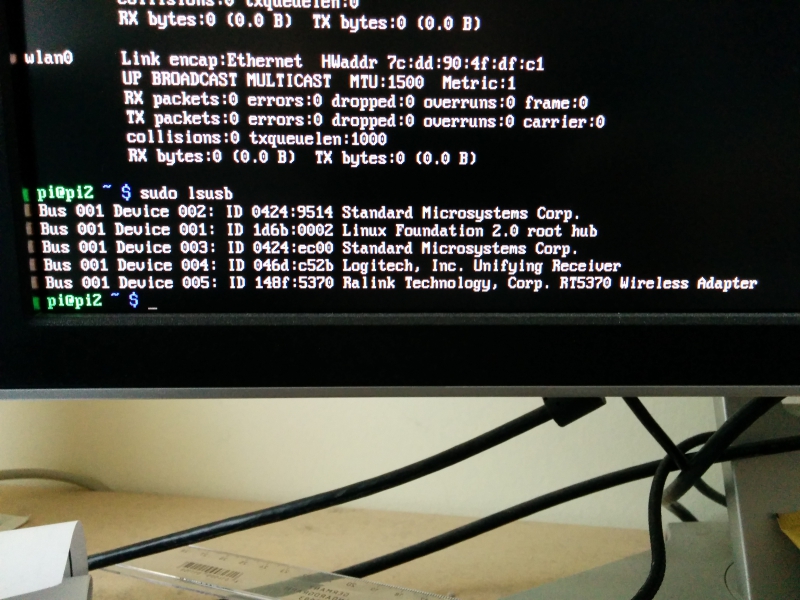
Alternatively, you should already see it listed as a wlan0 device:
3) Scan for WLANs:
# sudo iwlist wlan0 scan | grep ESSID
4) How to config the wlan adapter ?
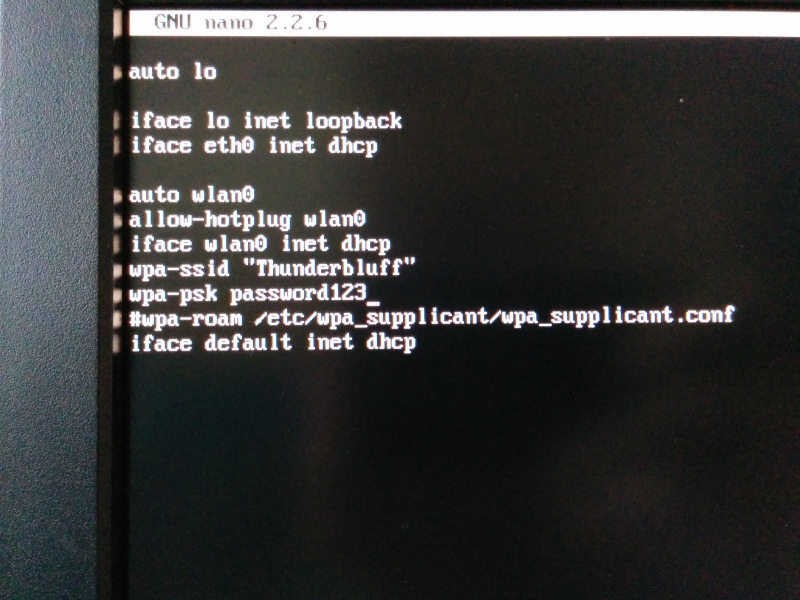
The normal interfaces file looks like this:

# sudo nano /etc/network/interfaces
change the manual entry to dhcp:
“iface wlan0 inet dhcp”
Add auto wlan0
COMMENT OUT THE WPA_ROAM ROW !
Add your wpa_SSID:
wpa-ssid “Thewifi”
wpa-psk mypassword
I didn’t use quotes for the password, only for the Wifi SSID Name.
5) Define your WLAN Network in the wpa_supplicant.conf
# sudo nano /etc/wpa_supplicant/wpa_supplicant.conf
ssid = the name of your WLAN (e.g Thunderbluff)
psk = Password of your wlan
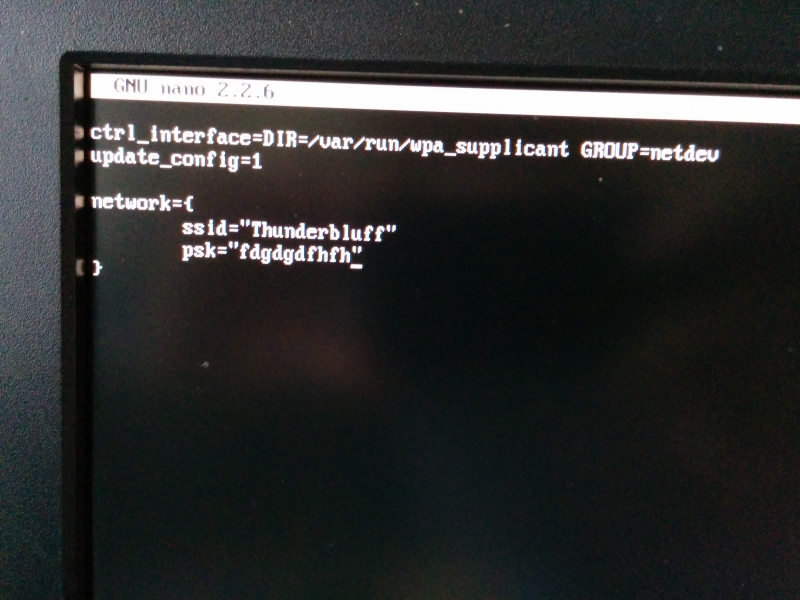
After the next reboot, it should try to connect automatically to that network.
Install Retro-Pie
First, update the sources
#sudo apt-get update
#sudo apt-get upgrade
Download the latest image
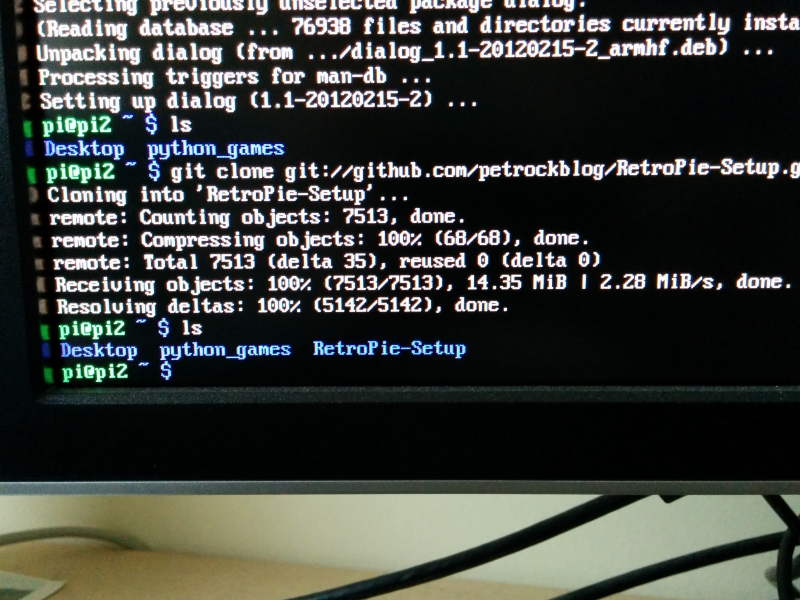
To obtain the installation script you first need to install two packages with
# sudo apt-get update
# sudo apt-get install -y git dialog
Then you can download the latest RetroPie setup script with
# git clone git://github.com/petrockblog/RetroPie-Setup.git
# cd RetroPie-Setup
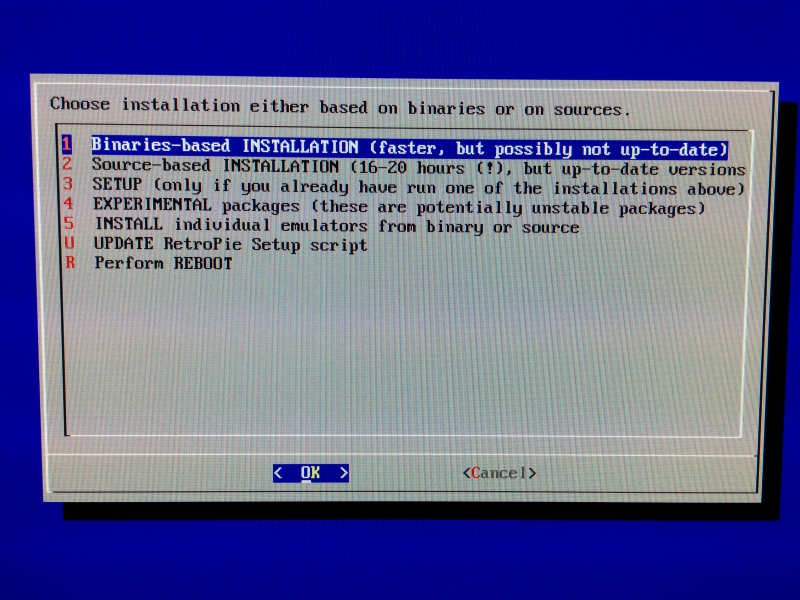
# sudo ./retropie_setup.sh
The script automatically install some missing packages, e.g the python-lxml, gcc compiler…
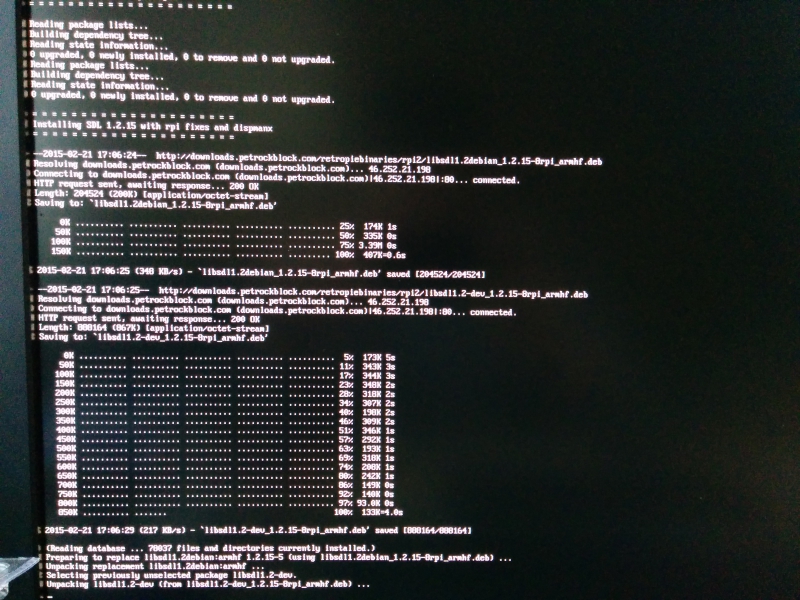
I selected BINARY installation. It’s much faster (still takes some 20mins or so). SOURCE Installation takes over 20 hours to compile !
Make sure to have an internet-connection, as it will download dependencies during the installation !
We have to place some BIOS files later on for different emulators, e.g. GameBoy Advance, Mame, Neogeo, later we’ll fix this.
The missing BIOSes are:
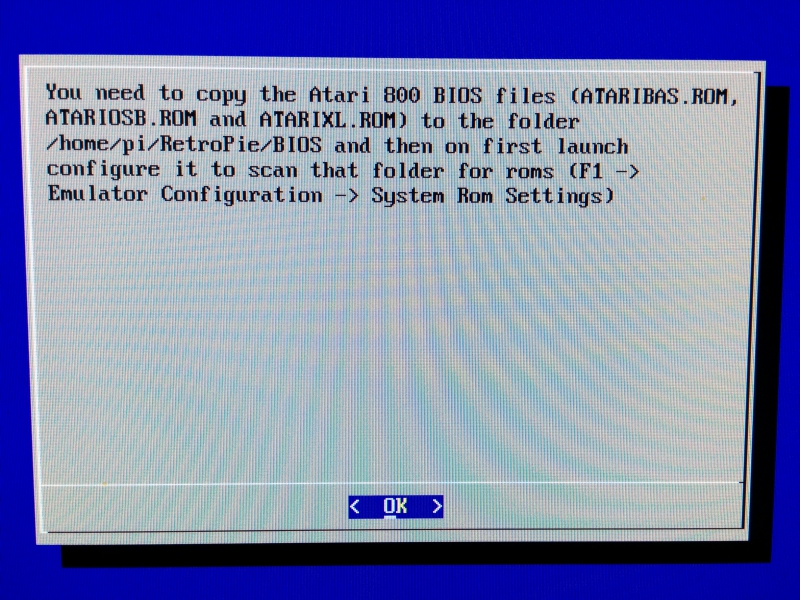
- Atari 800: Ataribas.rom, atariosb.rom, atarixl.rom
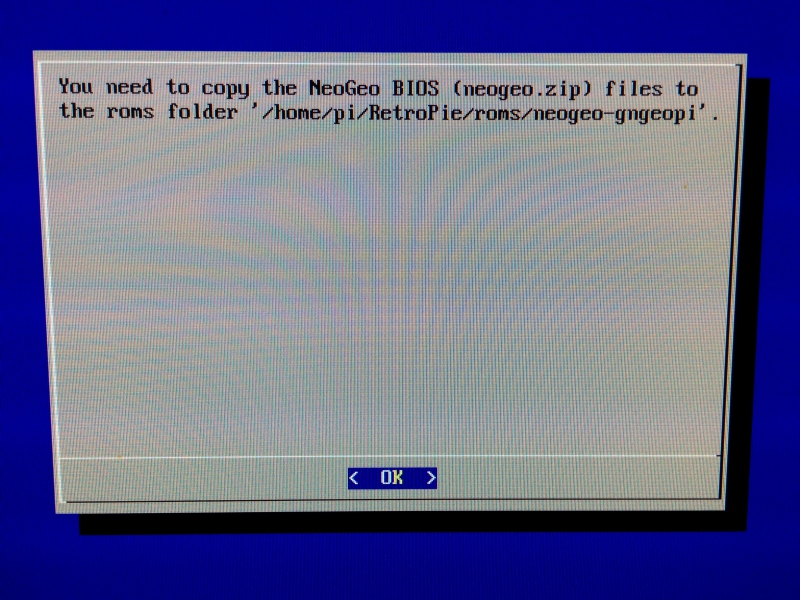
- NeoGeo Bios: neogeozip. I’ve put the extracted files it into /opt/retropie/emulators/gngeopi/neogeobios/
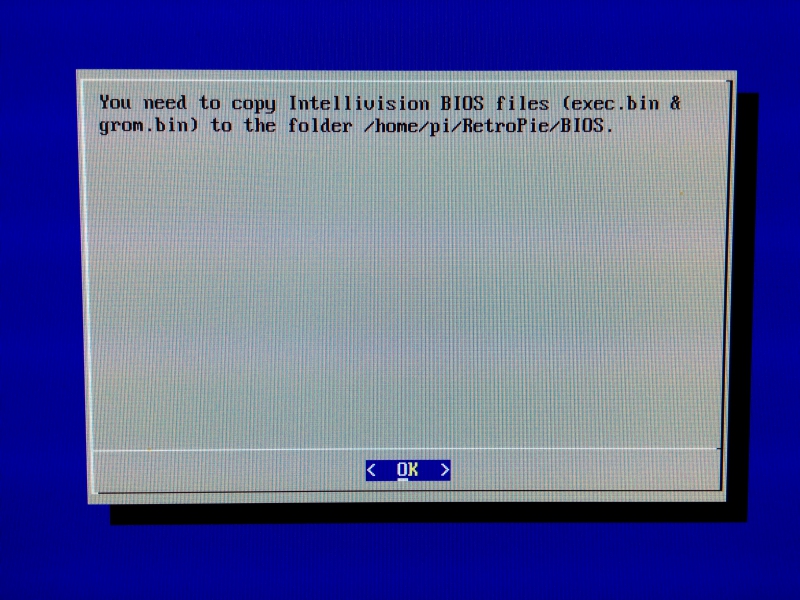
- Intellivision: exec.bin, grom.bin
Starting emulationstation !
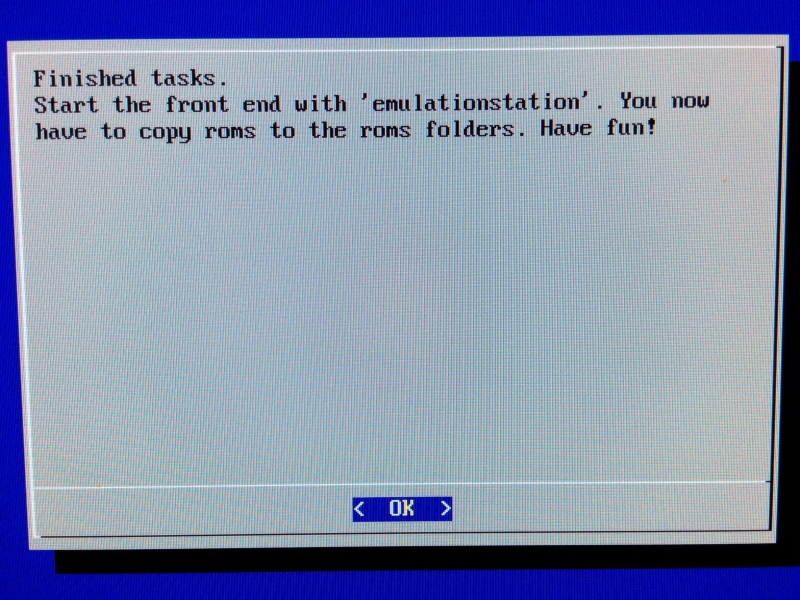
easy…as the script said: type emulationstation. No sudo needed. Emulationstation will create the /home/pi/.emulationstation directory (hidden). It will configure the gamepad connected to it.
Attention: the gamepad config is ONLY to navigate through emulationstation, which is nothing else than a beautiful graphical interface that starts emulators (aka frontend).
wait…no Super Nintendo Emulator or <insert favorite emulator here> ? But I installed it !
Yep. Cause the ROMS folder is empty 🙂 You first have to fill it with some ROMS (make sure you only download ROMS of games you actually own!). If a romfolder of an emulator is populated, the emulator will show up.
Copying ROMS to the Pi
There’s a few possibilities to get roms to the Pi:
a) USB-Stick
b) Mount a fileshare on your PC or NAS
c) download it using the GUI (type startx in the shell)
a) Mount the USB stick. The device can vary, I suppose it is “sda1”.
# sudo mount -t vfat /dev/sda1 /mnt/usb
The folder /mnt/usb must exist. You can chose any empty folder you like. You can create the /mnt/usb with the command:
# sudo mkdir -p /mnt/usb
b) Mount a fileshare
if you have a fileshare on a NAS or PC, you just have to know the HOSTNAME and SHARED FOLDER NAME of that device. Usually you must provide a username and password too.
We will mount a network share with an user called admin with password password123 (the best password!).
Create a folder, where you want to “see” your share later, e.g “nasshare”
# mkdir /home/pi/nasshare
Then we mount the shared folder named “iso” from our networkserver “nas” to that folder. As the server wants a login, we provide admin and a password
# mount -t cifs //nas/iso -o username=admin,password=password123 /home/pi/nasshare
(You can add this row to your /etc/profile file to automatically mount the share on startup.)
# cp * /home/pi/RetroPie/roms/snes-pisnes/
On starting emulationstation again, you should see the SNES emulator be available. Notice, that the “pi-snes” is the default snes emulator installed with retropie, there are 2 other rom directories for snes games, don’t use them unless you change from the default pi-snes emu to something else.
Joystick setup
Setting up joysticks and the SNES-Dev GPIO-Driver to use original SNES controllers.
First, enable the SNES driver
# sudo ./retropie_setup.sh
a) Choose “3 Setup”
b) Choose 323 SNESDev
c) Choose the correct Adapter first ! if your GPIO button points “top”, you have a version 1.x, if it points “outside” the picase, it’s a version 2.x
d) enter the SNESdev menu again, then choose “2 Enable SNESDev ….pads and button”
Install the joystick test package:
# sudo apt-get install joystick
Test your joystick using:
# jstest –event /dev/input/js0
js1 is the 2nd joystick, assuming you want to test your SNESdev controllers
Auto Login
You probably want your Pi to login automatically on start, do this:
Edit the inittab file:
#sudo nano /etc/inittab
Disable getty
Search for this:
1:2345:respawn:/sbin/getty 115200 tty1
Add # at the beginning of the line to comment it out
#1:2345:respawn:/sbin/getty 115200 tty1
Replace it with the login:
1:2345:respawn:/bin/login -f pi tty1 /dev/tty1 2>&1
Quit and save the file, reboot to test. Make sure not to type any errors here.
! UPDATE !
The autologin breaks some of my emulator in emulationstation, I don’t know why, but seems to have to do with the TTY. Use at your own risk!